
posts in
tips
How I Kit Up For Brisk Rides
11/07/2018


This post may be sponsored or contain affiliate links, which means I may receive a gift or small commission, at no cost to you if you make a purchase through a link. See my full affiliate disclosure here.


 ADAPT
ADAPT
 PROOF
PROOF


KIT I'M WEARING
Twitlight Jacket + MVP Bib Tights + Horizons Jersey + Signature Cap from Machines for Freedom
Proline Vest + Signature Cap + Signature Neck Warmer from Hummingbird Athletic
Thermal Bib Tights from Twin Six
Pro Dri Fit Short Sleeve Base + Long Sleeve Pro Dri Fit Thermal From Nike
Thermal/Waterproof Cycling Shoe Covers from Pearl Izumi
For more gear and kits to wear for the brisky ride, check out these posts...
Cycling Jersey's To Keep You Warm
Staying Warm On A Cold Ride
Keep Your Extremities Warm On A Cold Ride
Hope you enjoy the video and that it gives you inspiration to keep riding throughout autumn. For more videos, you follow along Youtube here.
Fall is probably one of the best times of the year to ride, maybe even more than summer! With cooler temps getting outside is a little easier as we won't need to face the heat. But for many of those riding through the seasons, autumn can be daunting; short evenings, colder temps, and changeable weather often mark the time to hang up our wheels or attach them to an indoor trainer. For tips and tricks to stay on the road, learn what to wear and how to wear it with these examples I demonstrate.
Take note that I'm sharing here two options for cooler temps for around 35F-50F and 50F-65F. You'll see that you can layer either way but you'll also want to consider the temperature you'll be riding to properly kit up.
While we all think our usual cycling kit should be fine with a few layers added, there are some rules that you should memorize when thinking about kitting up for brisk rides:
Fit: Wear close fitting layers that insulate every curve of your body. If you wear loose kit, you are more likely to pump air into those pockets where cold air can fill, releasing the heat from your body.
Warmers: You are most likely to heat up on your ride so kit up with removable layers on the days you'll be doing really hard rides. That could be arm/leg warmers, vests, jackets etc.
Versatility: Take extra layers that you can pack in our jersey pockets, wear a breathable base layer and mid-layer in case the weather takes a turn.
AUTUMN KIT
Conditions vary and the days can be unpredictable, so dress with versatility in mind. Here is one of our recommended outfits for riding in autumn explained from head to toe.
 |
BASE
Base layers sit close to the skin, working to wick away sweat – without one, this sweat can turn to clamminess and chills very quickly. Layering is the best way to manage your temperature as the weather changes. Make sure you have options to layer up or down, starting with a good base layer. Base layers are the foundation of a winter riding outfit, and they play a far more complicated role in temperature regulation than simply keeping your upper body warm.

THERMALS
There are few more cosy and comfortable cycling garments than thermal bibs and jerseys. Their warmth isn’t just derived from the weight of their fabrics, but from the use of brushed-back linings – the official name of the soft, fluffy interior of thermal clothes. These soft, short loops of fabric hold onto warm air around your body, creating a layer of insulation. Warm legs will work better, but not just that – thermal bibs and tights add warming material around your lower back and torso to keep your core warmer.

COVER UP
To shield from the rain, you'll need a buffer for the wind and a layer of warmth where you lose heat the most. Choose a cap or hat that reflects the conditions facing you.
A quality merino neck warmer or winter hat can keep you feeling warm and also stashed into a pocket whenever needed.

WIND BLOCK
For days when a windproof jacket is too much, choose a base layer, jersey, or vest with windproof front panels, and breathable rear panels. This will block the wind head-on, while allowing excess heat to escape out of the back, a clever way of staying warm without getting sweaty.
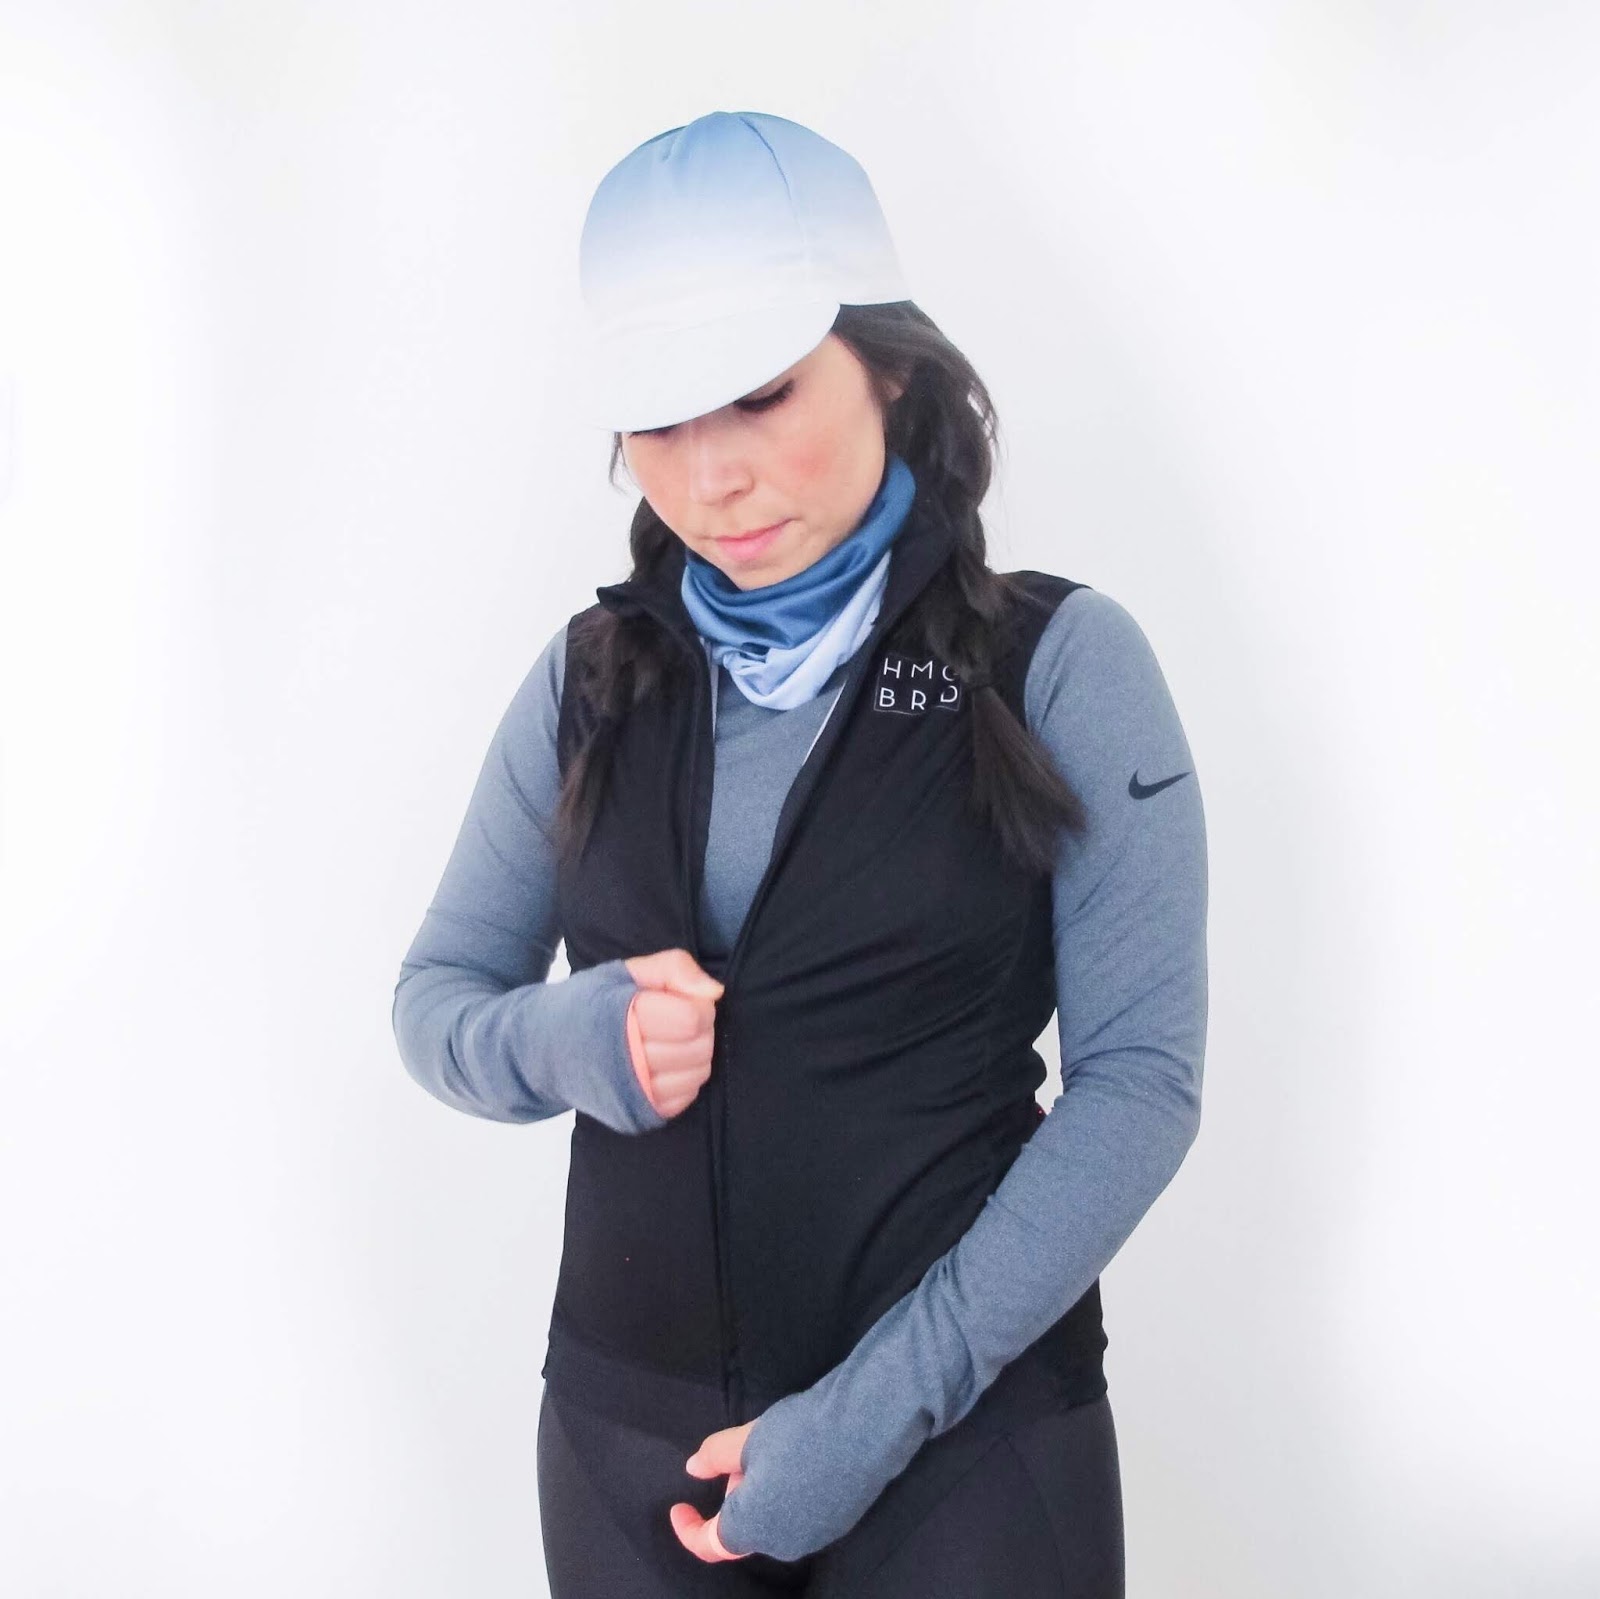
A cold breeze can cut through layers but one sure way of staying warm is to wear an outer layer with a windproof finish, keeping cold air away from your core. A windproof best and warmers allow you to adapt to the conditions on the go. Keeping arms, knees, and neck covered will ward off any wind chill and can easily be taken off as you and the weather warms up.

If the weather looks uncertain or you get caught in the rain, a wind and waterproof jacket that packs easily into a pocket will go a long way in keeping you dry and warm. A wind and water resistant outer keeps the chilly weather at bay so you can focus on riding in comfort.

ACCESSORISE
Your hands and feet are the first things to feel the cold, and the right choice of gloves, socks, and overshoes can keep you riding through the most bitter weather. Hands and feet are the perfect place to include high visibility detailing – as your feet are almost constantly moving while riding, and hands move while signaling, hi-vis elements are more likely to catch the eye.

COVER YOUR SHOES
A pair of shoe covers can add a much needed boost to the warmth of your feet, offering extra insulation and protecting socks and shoes from water and the grime of Autumn roads.
KIT I'M WEARING
Twitlight Jacket + MVP Bib Tights + Horizons Jersey + Signature Cap from Machines for Freedom
Proline Vest + Signature Cap + Signature Neck Warmer from Hummingbird Athletic
Thermal Bib Tights from Twin Six
Pro Dri Fit Short Sleeve Base + Long Sleeve Pro Dri Fit Thermal From Nike
Thermal/Waterproof Cycling Shoe Covers from Pearl Izumi
For more gear and kits to wear for the brisky ride, check out these posts...
Cycling Jersey's To Keep You Warm
Staying Warm On A Cold Ride
Keep Your Extremities Warm On A Cold Ride
Hope you enjoy the video and that it gives you inspiration to keep riding throughout autumn. For more videos, you follow along Youtube here.
Bike Bag Essentials
11/06/2018

This post may be sponsored or contain affiliate links, which means I may receive a small commission, at no cost to you, if you make a purchase through a link. See my full affiliate disclosure here.
When you’re out for a ride, you need to be prepared to fix a flat tire, repair a broken chain or tighten a loose bolt. You also need to be prepared with other essentials like a phone, cash, ID, and snacks. A well-chosen tool collection and bike bag will go a long way in helping you be prepared for anything on the road and make your ride more comfortable and carefree.
For the sake of those riding shorter distances on a commute or recreational ride, we will cover the basics of what to carry in your bags for the journey ahead.
If you’re a novice cyclist, you can start out with just the basics like a repair kit and tools. As you get more advanced you can then add tools gradually as you gain more experience and start planning more adventurous rides. When it comes to preparing for your ride, you should at least know how to do a Pre-Ride Bike Inspection and know some essential Bike Maintenance skills. In the long run, it will save you a lot of time and money.
When determining what essentials to take on a ride, you’ll need a way to carry them. Options include saddle packs, handlebar bags, frame bags, panniers and backpacks. For shorter recreational rides, a small saddle pack that fits a spare tube, patch kit and a multi-tool is probably sufficient. To carry essentials like a phone, ID, keys, cash, or pump, a simple handlebar bag will be enough. On longer rides and commutes, bigger handlebar packs, rack trunks, frame bags, panniers and backpacks that hold your repair kit essentials and leave room for food, clothes and more will come in handy.
 |
| Road Runner Saddle Tool Bag |
Essential Bike Repair Kit Tools
Spare Tube and Patch Kit
The most common problem cyclists face is a flat tire. Always carry a spare tube and/or a patch kit with you. If your flat tire is caused by a small puncture, you’ll likely be able to use a patch kit to fix it. For large punctures and blowouts, replacing the tube is your best option.
Tire Levers
Tire levers help you pry your tire off the rim of your wheel when you’re fixing a flat. They’re especially helpful when you’re removing a road tire, as opposed to a mountain bike tire, because road tires typically fit very tightly on the rim.
Bike Pump
If you get a flat tire while you’re out on the road, you’ll need a way to inflate the tire after patching or replacing your tube. Always carry a small hand pump or CO2 inflator that will fit in your backpack or mount to your bike frame.
Multi-tool
A multi-tool can handle a surprisingly wide variety of repairs and its versatility makes it a good value. Its small size means it fits easily in an on-bike saddle pack or a backpack. A good multi-tool has the following:
- Variety of Allen wrenches
- Ajustable wrench, or open or hex wrenches (8, 10, 15mm are the most common, but size requirements vary depending on the bike)
- Chain tool
- Phillips screwdriver
- Flathead screwdriver
Essentials To Carry In A Bike Bag
On bike rides, especially road rides, it’s wise to carry some money, snacks or other nutrition, your ID, your insurance card and a cell phone just in case you get in an accident. Money will also come in handy on a mid-ride stop at a store to grab a snack or get a cold drink when your energy is waning.
Some repairs require tools and knowhow that you might not have. If your bike breaks down and you can’t fix it, you’ll be happy to have your cell phone so you can call a friend or family member for a ride home. A smartphone can also be handy for looking at a map or tracking your ride with a cycling app.
There are lots of bike bags to choose from but I like to use the handlebar bags by PoCampo and RoadRunner. I get durabilty, waterproofing, and plenty of space left using these two.
Shop Bike Bags
 |
| Po Campo Kinga Handlebar Bag | Road Runner Burrito Bag |
You can learn more about what gear and essentials to carry on a ride here.
Guide To Bike Safety and Visibility
11/01/2018
Luckily, there’s much we can do to increase safety and make ourselves more visible on the road. To get you confident to train or commute in the dark, we’ve listed some safety tips and late fall cycling essentials, which brings together the trinity of safe nighttime riding—illumination, reflectivity, and hi-vis coloring—without sacrificing comfort, waterproofing, and warmth.
Inspect Your Bike
Anyone who’s had to change their tire in poorly lit conditions knows it’s not fun. Not to mention dangerous, if you don’t have plenty of space away from the road, or if you get a flat in a rough area.
Minimize the chances of breaking down by taking extra care of your bike. Don’t forget to inspect your tires, chain, and brakes by doing a pre-ride inspection the night before. Also, make sure to always keep your cell phone on you when riding alone in the dark.
Know Your Route
Try to choose routes you’re very familiar with when biking at night. Roads with potholes and gravel become much more dangerous when traveling for the first time at night.
If you have to take a new route, do some research first. Is there a bike lane? Is it well lit? It’s helpful to hop on Google street view when planning your trip, so you can be away from tricky intersections, blind corners, and large potholes.
Inspect Your Bike
Anyone who’s had to change their tire in poorly lit conditions knows it’s not fun. Not to mention dangerous, if you don’t have plenty of space away from the road, or if you get a flat in a rough area.
Minimize the chances of breaking down by taking extra care of your bike. Don’t forget to inspect your tires, chain, and brakes by doing a pre-ride inspection the night before. Also, make sure to always keep your cell phone on you when riding alone in the dark.
Know Your Route
Try to choose routes you’re very familiar with when biking at night. Roads with potholes and gravel become much more dangerous when traveling for the first time at night.
If you have to take a new route, do some research first. Is there a bike lane? Is it well lit? It’s helpful to hop on Google street view when planning your trip, so you can be away from tricky intersections, blind corners, and large potholes.
Lighten Up
Having lights on your bike is vitally important to night riding – to see where you’re going, of course, but more importantly, to be seen by others.
At a minimum, you should have flashing front and back lights on your bike – flashing lights are significantly more visible to drivers than static lights. But even better than that: ankle lights. Studies have found that lights that trace the movement of your feet as you peddle are the most eye-catching of all, may be great to add a high vis strap to your ankle or shoe covers with reflective details.
Having lights on your bike is vitally important to night riding – to see where you’re going, of course, but more importantly, to be seen by others.
At a minimum, you should have flashing front and back lights on your bike – flashing lights are significantly more visible to drivers than static lights. But even better than that: ankle lights. Studies have found that lights that trace the movement of your feet as you peddle are the most eye-catching of all, may be great to add a high vis strap to your ankle or shoe covers with reflective details.
 |
| Machines For Freedom: The Twilight jacket |
Be Seen
According to the Denver Post, the number of cycling fatalities is increasing each year. The most dangerous mistake casual cyclists make is overestimating their visibility when riding. Fluorescent colors are great during the day but don’t cut it at night. Make sure that you have plenty of retroreflective surfaces on your bike and clothing when cycling at night.
Most bikes will come with some reflective areas, but if you’re serious about staying safe at night, you’ll want to beef these up. Get some reflective tape, and use it liberally: helmet, clothing, bags, bike frame, rims, and pedals. Or you can kit up on reflective clothing and gear.
Obey Traffic Laws
It’s tempting to ignore the rules of the road, especially if there’s traffic and you’re in a hurry, but this is the cause of a large percentage of bike accidents. Weaving through traffic or around parked cars is especially dangerous at night. Ride like you’re invisible – because to inattentive drivers, you often are.
It’s tempting to ignore the rules of the road, especially if there’s traffic and you’re in a hurry, but this is the cause of a large percentage of bike accidents. Weaving through traffic or around parked cars is especially dangerous at night. Ride like you’re invisible – because to inattentive drivers, you often are.
If there isn’t a comfortable bike lane, it’s safer to ride in the middle of the lane than squeezing along the side, where getting clipped by passing cars is a real possibility. The vast majority of drivers will understand, and even if they don’t, it’s much better to annoy a couple of cars stuck behind you than compromise your safety.
Bike Safety
The vast majority of bike thefts happen at night. Simply chaining your bike up isn’t enough – anything but the most heavy-duty chains can be cut through with bolt cutters relatively easily. The best possible place to store a bike, outside of your own home, would be a durable and secure bike locker. You’ll find these on many campuses, city squares, or subway/bus stations.

Luckily companies are coming out with better bike locks that are lighter and harder to break through like LiteLok's Silver. A light, flexible, secure, and easily packable bike lock; LiteLok is a great combo when used with a cable to secure tires and saddles. Good locks may cost more than $50, but it’s worth it! With a cable, it is best to wrap through the lock and around your front wheel, which can be removed in seconds if not protected.
Biking at night can be intimidating if you’re not used to it, but there’s something very special about a peaceful night-time bike ride that everyone should experience occasionally. If you stay alert and follow the safety tips above, you’ll be able to safely enjoy the beauty of night time riding.
Image Courtesy: Machines For Freedom
What You Should Know About Gravel Riding
10/30/2018

Recently I invited a group of friends for an adventure of gravel riding. We headed out to Mohonk Preserve in The Gunks of New York to take in autumns best views and 80 miles of carriage trails. For many in New York, heading out to the Catskills for a gravel riding session is common and its popularity continues to grow. I personally love to ride gravel on the trails when I can, especially in the peak season of autumn so I figured inviting a few adventurous girls along would a great way to share the experience.
While I didn't worry too much about whether any of us had much mountain biking and gravel riding experience, I did realize while planning that there are a few things to keep in mind when making your first gravel ride an enjoyable experience. If you're thinking about heading out for an epic gravel grinding adventure, here are a few tips to help you prepare for your first gravel adventure.
Whether you love mountain biking, cyclocross or road riding; gravel is the discipline that all but those most ardent road or mountain cyclists will love. The perks of riding gravel keeps you off busy roads, boosts your riding skills, multiplies your route options and lets you ride with more friends.

PLAN FOR YOUR ADVENTURE
Riding on gravel roads is not new. Mountain bikers and road riders have found themselves on gravel roads in rides and races for as long as bikes have been made. While your average mountain biker would prefer to shred singletrack all day and your typical road rider dreams of the smoothest roads, there is an increased interest for the peaceful adventure of gravel or groading (gravel & road).
When I had first tried gravel riding, I was out in Minnewaska State Park with my husband on mountain bikes. We swept through the woods with profound feelings of thrill from the speed and exertion we gave to reach unbelievable views of waterfalls, rivers, mountain top views along cliffs. I knew at the end that I was hooked! From that first experience I knew that I had to do it again.
Gravel riding is popular because of the variety of adventures you can do. It might involve a stream crossing, some hike-a-bike, even some light single-track; you choose. Whatever you choose to tackle on your ride, the thrill and satisfaction of putting together a loop you never thought possible — or seeing a view your road bike would never reach or your mountain bike would take days to pedal — is at the heart of gravel riding’s popularity.

CHOOSE YOUR GRAVEL RIDE
You can ride gravel on any bike, so start with what you have. If you need to get a gravel bike there’s a range of options. Consider how far you want to ride, how rugged the terrain is and your ability to handle technical situations. Ultimately, it’s a question of how you plan to use the bike.
Many people use cyclocross bikes, which are generally more aggressive and lightweight for short-duration races, by adding bottle cages and bigger tires. A mountain bike with semi-slick tires and harder gearing can also work and allow for more rugged adventures. Even a road bike can explore gravel roads if you use bigger, flat-resistant tires, add a bigger cassette for steep climbs and elevate your stem or handlebar to increase comfort and control.
My group and I used our road bikes since we knew we would be on carriage roads instead of technical trails. We made a few adjustments like lowering our PSI and switching out road tires for gravel tires. One thing to keep in mind if you do ride with regular road tires is to inspect them after a ride for any rock or tears and don't ride too far as you run the risk of wearing your tires out too quickly.
Many manufacturers (Trek, Cannondale, BMC, etc) are adding suspension, playing with different tire designs and adding disc brakes to make the perfect adventure machine. A gravel bike is part road and part mountain bike. This sounds like a cyclocross bike, but there is a difference: Cyclocross requires very light bikes, without bottle cages that can handle aggressive cornering. A gravel bike borrows big tires, slack geometry and disc brakes from mountain bikes; while drop handlebars and harder gearing for high-speed sections are taken from road bikes. The ultimate gravel bike generally provides more comfort and many options for carrying water and gear, including rack and fender mounts.

PREPARE FOR ADVENTURE
To ride gravel you’ll want to start working on your technical skills like cornering and descending on loose, bumpy terrain. Road cyclists might find the loose corners and descents unnerving, so make sure to take it slow and include some practice in a field or parking lot on your gravel bike. Mountain bikers may find the extended pedaling challenging, but you’ll get a boost in fitness when you are back on the trail, so embrace the endurance training and put your skills to work when the gravel route turns more technical.
My group had not had much experience descending through switchbacks on a difficult gravel trail and while we were enthusiastic and daring we had to take occasional stops to give our hands a break from braking. While there are challenges of climbs or descends that you may not be prepared for, always maintain a positive outlook and have fun with it, even if you have to walk your bike down or up.
Aside from bike-handling skills, it’s worth practicing your navigation skills to plan routes using both an old-fashioned map, route markers and a GPS-enabled device that can load navigation files from MapMyRide. On MapMyRide, you can find or create gravel routes with the ‘Search for Routes‘ page. You can also search “gravel” to find new-to-you routes at home or on your travels.
If you’re going bike-camping or take overnight journeys, do a few practice rides with your larger saddlebags or panniers to ensure you are able to ride comfortably and without interference from the accessories.
Doing gravel rides this autumn gave me a break from the norms and rules of road cycling. It was a reminder that gravel riding is about a lot more than just the road surface. Where road riding has for so long been marketed around data metrics of speed and fitness, gravel is more about the experience, the journey, and the environment. When we ended our ride, all we could think was "that was epic".
Cold Weather Skin Care For Cyclists
10/25/2018

Hydrate
Keeping up your water intake is just as important in the colder months when fatigue can often sneak up on you. Even when we don’t feel ourselves sweating, our body is losing water. Can you see your breath when you’re outside in the cold? That’s respiratory fluid loss and it’s one of the major ways our bodies dehydrate in the cold. Refilling an insulated bidon with hot fluids of electrolytes like Scratch Labs Apple Cider mix, hot tea, coffee, or bone broth are great ways to keep you warm and hydrated.
Nutrition
To combat dry, flaky skin in the winter, you may want to fill up on water based foods such as watermelon, cucumber, celery, carrot, and tomato. In the winter, think of soups concentrated in these water based foods as a nutritious post ride meal. Also reach for foods or a supplement rich in omegas 3’s and GLAs to replenish lost lipids in your skin — walnuts, salmon, sardines, flax seeds, and evening primrose oil all nourish skin from within. Taking a tip from Nordic countries with long winters, a typical winter diet is rich in fiber, vitamins, minerals, omega's, antioxidants found in a range of winter leafy and root vegetables like carrots, beets, turnips, and artichokes.
Sunscreen
An effort to hyper-hydrate and soothe the skin should never come at the cost of ditching daily sun protection. Sure, you may not see as much of the sun during the next few months, but UVA rays — the aging and cancer-causing rays that penetrate through windows and clouds, and into the deepest layer of skin — are still kicking, all day, every day. According to the Skin Cancer Foundation, engaging in winter sports increases your risk of overexposure to dangerous UV rays. To protect skin year round, find a product you can work into your beauty routine without having to think too hard about it.
Cover Up
I’ve covered this topic last week on protecting your extremities from the cold but a reminder of simply covering your exposed parts with windproof gloves, a balaclava or skullcap, shoe covers and clear cycling glasses will go a long way to help protect your extremities skin from windburn and dryness.

Moisturize
You need to cram as much moisture into your skin as possible. “The most hydrating formulas have ingredients like glycerin, ceramides, and hyaluronic acid, that pull water into your skin,” says Jeannette Graf, MD, an assistant clinical professor of dermatology at Mount Sinai Medical Center in New York City. This isn't just for your face, though — your entire body needs more hydration. Look for oil-free moisturizers for the face, and something greasier, and more glycerine-based for the body.
Moisturizer can be complimented with a recovery serum or balm to assist repairing facial skin after a ride, leaving you with soothed skin the next day.
Lip Balm
Dry lips may be inevitable but don’t toss the need to cover your lips aside. While they will be overexposed, you can combat cracked lips with covering your lips with a thick lip balm with SPF before your ride and consistently applying throughout.
Warm Showers
Please note here that the key term is “warm”. I know we talked about hot bath rituals after a cold ride but in winter “hot” water on your skin should be avoided so you aren’t stripping your body of essential oils needed to keep your body lubricated. Limit your shower to 5-10 mins and immediately apply a moisturizer after drying off.
Embrocation
Some cyclists rely on a secret salve to help adapt to the changing season. Embrocation salves can be used for those cool fall morning rides when leg warmers are too hot to wear but it’s too cold to go bare. Embrocation users swear by its effectiveness in temperatures 50-70 fahrenheit acting like a thin barrier against wind and rain. It is an art to apply and take off so make sure you do your research before applying. If it’s too cold, fleece, warmers, or thermals are your best bet.
For winter moisturizers and products to keep your skin hydrated and from damage, I’ve rounded up a few products. Some of which I love and use everyday and some I only use for winter.
Your Feedback: Staying Warm On A Cold Ride
10/23/2018

Last week I brought you some tips on Keeping Your Extremities Warm and last year I shared with you the Ultimate Winter Cycling Guide to help you navigate your way into cycling in cold climates. Today I'm bringing you some tips from readers suggestions that will help you stay warm and help make smart decisions when cycling on the road in cold weather.
Layer Smart
Rule number one for staying warm on the bike is to layer your core. Not only will it keep you warmer than opting for a single thick jacket, but it will also make adjusting to temperature changes easier. Layer your core by using:
Rule number one for staying warm on the bike is to layer your core. Not only will it keep you warmer than opting for a single thick jacket, but it will also make adjusting to temperature changes easier. Layer your core by using:
· A base layer that wicks away moisture
· A mid layer with thermal properties to retain heat
· An outer layer with windstopper fabric to block cold air and wind
· A mid layer with thermal properties to retain heat
· An outer layer with windstopper fabric to block cold air and wind
When it’s really cold (below 40 degrees) you may also want to consider layering with leg warmers over (or under) your winter tights and arm warmers under your jacket. Pack an extra pair of each (they’re compact and easy to carry) so you can switch out the pair you’re wearing mid-ride if they become damp.
Carry A Spare
While you may have layered perfectly for the current weather, you never know when things are going to take a turn for the worse. To be safe, always take an extra windbreaker vest or jacket to add a layer if conditions get especially messy. It will also be useful during a surprise rain storm or on a descent that turns out to be a little colder than expected.
While you may have layered perfectly for the current weather, you never know when things are going to take a turn for the worse. To be safe, always take an extra windbreaker vest or jacket to add a layer if conditions get especially messy. It will also be useful during a surprise rain storm or on a descent that turns out to be a little colder than expected.
Invest in a good base layer.
The job of a good base layer is to keep you dry as you sweat. This is especially important during the winter, when moisture on the skin can make you cold quick. While cycling gear can be expensive, splurging on a good winter base layer that fits well, has a high collar, and features technology with moisture-wicking properties will keep you happy and warm on the coldest of days. Gore Bike Wear Base Layer Thermo Long Sleeve makes the perfect match for both windy and chilly days.
The job of a good base layer is to keep you dry as you sweat. This is especially important during the winter, when moisture on the skin can make you cold quick. While cycling gear can be expensive, splurging on a good winter base layer that fits well, has a high collar, and features technology with moisture-wicking properties will keep you happy and warm on the coldest of days. Gore Bike Wear Base Layer Thermo Long Sleeve makes the perfect match for both windy and chilly days.
Shoe Covers
Layering is generally a good idea—but on your feet, wearing multiple pairs of socks will give your shoes a tight fit. Instead, use quality wool socks and a shoe cover that’s waterproof and uses windstopper fabric to keep cold air out. If it’s really cold, use two pairs.
Layering is generally a good idea—but on your feet, wearing multiple pairs of socks will give your shoes a tight fit. Instead, use quality wool socks and a shoe cover that’s waterproof and uses windstopper fabric to keep cold air out. If it’s really cold, use two pairs.
Cover Your Head
Thirty percent of the body’s heat is lost through the head. And just like with the core, hands and feet, layering is a good idea. Here are a few tips:
Thirty percent of the body’s heat is lost through the head. And just like with the core, hands and feet, layering is a good idea. Here are a few tips:
· For the outer layer, use an aero helmet if you own one. Aero helmets usually have less vents, retain heat better than traditional helmets, and will keep you dry in the rain.
· If you don’t own an aero helmet, a helmet cover will work just as well.
· For a base layer, use a cycling cap for temperatures 45 degrees and up. In colder temperatures, use a balaclava or skull cap specific to cycling that’s slim enough to fit under your helmet and covers the ears.
· If you don’t own an aero helmet, a helmet cover will work just as well.
· For a base layer, use a cycling cap for temperatures 45 degrees and up. In colder temperatures, use a balaclava or skull cap specific to cycling that’s slim enough to fit under your helmet and covers the ears.
Warm Liquids
Just like cycling in the hight of summer, you must also stay ultra hydrated during winter. Cold and even room temperature fluids aren’t a good idea when it’s really cold. You may dehydrate just as fast so instead, stay warm by filling an insulated water bottle with warm tea—an early and late season trick commonly used by the pros. Another option is the apples and cinnamon hydration mixture from Skratch Labs, which is really tasty and warm.
Just like cycling in the hight of summer, you must also stay ultra hydrated during winter. Cold and even room temperature fluids aren’t a good idea when it’s really cold. You may dehydrate just as fast so instead, stay warm by filling an insulated water bottle with warm tea—an early and late season trick commonly used by the pros. Another option is the apples and cinnamon hydration mixture from Skratch Labs, which is really tasty and warm.
Mid-Ride Break
If you’re heading out for a ride of two to three hours or longer, plan to take a break mid-ride. A coffee shop or restaurant is an ideal place to warm up and take a break. You can also use this opportunity to change any damp clothing and get something warm to drink.
If you’re heading out for a ride of two to three hours or longer, plan to take a break mid-ride. A coffee shop or restaurant is an ideal place to warm up and take a break. You can also use this opportunity to change any damp clothing and get something warm to drink.
Tip: When you refill your bottles, ask the waitress or barista for hot water. This will help you stay warm during the second half of your ride.
Cover Your Eyes
Sunglasses aren’t only for bright, sunny days. In the winter, snow, wind, and rain can make it hard to see without eye protection. For those cloudier days, most of the top sunglasses options for cycling (like this one from Smith Optics) will also come with a clear lens you can switch to when the sun isn’t out.
Snack
It’s always important to eat before a ride, but it’s especially important during the winter. Not only will you need the fuel for exercise, but the food you eat will also go a long way toward keeping you warm in the coldest temperatures. Make sure to eat a hearty meal (such as oatmeal) before you ride, and carry additional food with you on the bike to stay topped off.
It’s always important to eat before a ride, but it’s especially important during the winter. Not only will you need the fuel for exercise, but the food you eat will also go a long way toward keeping you warm in the coldest temperatures. Make sure to eat a hearty meal (such as oatmeal) before you ride, and carry additional food with you on the bike to stay topped off.
Intensify Your Ride
Mixing intervals into your winter workouts will serve two purposes: You’ll shorten the amount of time you need to spend outdoors, and the increase in intensity will keep your core temperature elevated. Keep in mind that hard efforts may cause you to sweat more, so wear a good base layer to keep from making the situation worse. I generally only cycle 20 miles a ride in winter and add more hills and speed to keep me warm and fit throughout the season.
Hot Bath
One of the surprising feedback points was to take a hot bath after the ride. When you're out on a cold ride, your body is working harder to keep you warm and moving, making fatigue in your muscles a reality so a good way to bounce back and recover is a hot dip in the bath or hot tub.
I like to think of cold weather cycling like ski season. As long as you have the right gear, know the skills you need to cycle in colder temps, you can enjoy the ride and have an apres-bike experience all winter long.
Image: Machines For Freedom
Mixing intervals into your winter workouts will serve two purposes: You’ll shorten the amount of time you need to spend outdoors, and the increase in intensity will keep your core temperature elevated. Keep in mind that hard efforts may cause you to sweat more, so wear a good base layer to keep from making the situation worse. I generally only cycle 20 miles a ride in winter and add more hills and speed to keep me warm and fit throughout the season.
Hot Bath
One of the surprising feedback points was to take a hot bath after the ride. When you're out on a cold ride, your body is working harder to keep you warm and moving, making fatigue in your muscles a reality so a good way to bounce back and recover is a hot dip in the bath or hot tub.
I like to think of cold weather cycling like ski season. As long as you have the right gear, know the skills you need to cycle in colder temps, you can enjoy the ride and have an apres-bike experience all winter long.
Image: Machines For Freedom
KEEP YOUR EXTREMITIES WARM ON A COLD RIDE
10/18/2018

Temperatures are quickly dropping and the cold chill is starting to settle in. While we don't want to stop riding we also don't want to be uncomfortable. There are ways for us to overcome the chill with just a little extra preparation. When riding outdoors in fall or winter, the blood in your body naturally goes to your core to stay warm instead of your extremities — which unfortunately can make it more difficult to keep your hands and feet from getting cold.
Having frozen fingers and toes can be really unsettling on a ride and make holding onto handlebars, steering, braking, and shifting really difficult, especially when descending. To help keep your exteremeties warm and cozy, use these tips for extra layering and improving blood flow when your heading out in the cold.
Warm Up
Certain materials like neoprene only work if your hands are warm first. For this reason, it’s a good idea to keep your hands warm and put your gloves on indoors before heading out. Try warming them next to a heater for a few seconds or holding a hot cup of coffee to get them nice and toasty. You’ll be surprised how much it’ll help once you’re outdoors.
Cover
The harder your body has to work to keep your core warm, the colder your hands will be. Since a lot of heat from your body is lost through your head, wearing a skull cap and helmet cover can help keep blood flowing to the extremities.
Layer the core with a base layer and purchase a good thermal, windproof jacket to keep your arms and chest warm. On particularly cold days, a third layer may be needed.
Cuff
A jacket and gloves won’t do a lot of good if they aren’t keeping the cold out. When choosing these clothing items, make sure the cuffs are long enough so your jacket sleeves fit over the gloves to keep the cold air from getting in. Gloves with velcro closures may also be helpful to create a more secure seal.
Layer
While it is still possible to layer the hands just as you would the core, doing so may restrict your finger dexterity and decrease circulation if the fit is tight. In general, two layers is probably as many as you’ll be able to use. Your outer glove should be the bulkier of the two and feature a windproof and waterproof shell.
If you plan to layer under your thicker, thermal glove, make sure they are large enough to fit a second pair without being too tight, which can decrease your circulation. Your second layer, similar to a base layer, should be thinner and more breathable. When it’s really cold, consider a lobster-style glove that groups the fingers together. This decreases individual finger dexterity but can improve warmth.
Wiggle
Even with the occasional pull of the brake levers or gear shift, your hands don’t move a whole lot when you ride. This stationary position makes it easy for your fingers to turn into icicles as they take the brunt of the wind chill on the bar tops or hoods.
To combat some of this, change hand positions frequently. When possible open and close your hands or wiggle your fingers to increase your circulation through movement. You’ll find every little bit helps when it’s really cold.
Ride
A long, slow ride that forces you to spend a few hours braving extreme temps makes it much more difficult to stay warm. On those brutally cold days, it’s a better idea to keep your rides shorter and at a higher intensity, which makes it significantly easier to keep the temperature in your extremities from dropping.
Though, unlike the hands, your feet are constantly moving, it’s still a challenge to keep them warm on the bike. The good news is you have more layering options to trap heat and keep the cold air out. Here are some layering options you should consider:
Socks
It might seem like a good idea to layer your socks the same way you would gloves. But wearing more than one pair of socks will make the fit of your shoes too tight, decreasing your circulation. Because of this, you should stick with a single pair of socks. Choose a pair specific to winter cycling that doesn’t significantly increase bulk but is made of a material like merino wool that keeps you warm while still maintaining some level of breathability.
Overshoes
Instead of using multiple pairs of socks, it’s a better idea to use a second layer on top of your cycling shoe. Like gloves for your feet, thermal overshoes usually feature fleece lining to improve warmth and a windproof/waterproof outer shell to protect you from the elements.
Keep in mind that there are a lot of different options to choose from depending on the conditions. For instance, toe covers may be suitable for brisk fall cycling, while a full coverage thermal ankle booty that can be cuffed under a pair of tights is a more realistic option during the winter.
Shoes
If you live in an area of the country that stays cold for long periods of time, you might want to invest in a winter-specific cycling shoe. These shoes are designed to withstand the harshest winter conditions and provide additional insulation against the wind, rain and snow. They also often provide ankle coverage while still providing more freedom of movement than you might have using multiple layers. Most of these options won’t require the use of an overshoe to keep your feet nice and toasty, though you’ll still have this option.
Insoles
Whether it’s through holes for the cleat screws or vents in the bottom of your shoe, the sole is one way cold air can find its way to your feet. If the options above haven’t quite worked, a winter-specific insole could be your last line of defense. These winter insoles feature a felt outer layer to keep you warm and dry and an internal layer of air cells to trap your body heat.
Tips
Like the hands, keeping your core warm helps keep your feet warm. Eating and drinking on the bike can also help you maintain your core body temperature and make it a little easier for your blood to circulate to your extremities.
If nothing else seems to work, there are a few other less conventional options you can try. These include feet warmers that can be slipped inside the shoe or wrapping the outside of your socks in plastic wrap or tin foil to trap heat and keep cold air out. Do be cautious with these options, though, as they do have the potential to cause your feet to sweat. If you end up with wet socks it’ll make it even harder to keep from getting cold feet.
Shop Cold Weather Gear
Subscribe to:
Posts (Atom)


Social Icons